

10 servings
YouTube instructional video is at the bottom.
What you’ll need
Cake flour or All-purpose flour
Sugar
Salt
Baking powder
Baking soda
Cornstarch
Gelatin
Unsalted butter (Room temp)
Large eggs (Room temp)
Whole milk (Room temp)
Sour Cream (Room temp)
Heavy whipping cream (Cold)
Vegetable or canola oil
5 large ripe bananas (1 lb. 12 ounces in weight)
1 large lemon
Vanilla wafers
Vanilla extract
Butter extract (Optional)
Cake batter extract (Optional)
Almond extract (Optional)
Confectioners’ sugar
Tools you’ll need
Baker’s joy non-stick baking spray
9-inch round cake pans
Hand or stand mixer
Food processor
Sturdy spoon and Whisk
Regular and offset spatula
Pastry brush
Mesh strainer
Disposable piping bag
Wilton # 1M tip
Cake turntable
Circular cake pad
Plastic wrap
Making the custard
Note- You can make the custard 3 days in advance. Make sure you make the custard the day before you decorate the cake. You can make the cake and the custard, and the gelatin mixture in one day and make the whipped cream the next day.
Step 1- Separate 6 egg yolks from 6 egg whites (Room temp). Place egg yolks into a large bowl and place egg whites into separate bowl. You can take the egg whites and make a meringue with it.
Egg yolk mixture
Step 2- In the bowl with the 6 egg yolks, add 2/3 cup sugar and 1/8 teaspoon salt. Stir vigorously with a whisk until mixture is a pale-yellow color and set aside.
Milk/Cornstarch mixture
Step 3- Add 1/2 cup whole milk and 3 tablespoons cornstarch into a medium sized bowl. Stir until combined and set aside.
Preheat fire to medium heat.
Custard mixture
Step 4- Add 2 1/2 cups whole milk into a medium sized pot and stir. Let come to a slighter simmer. Turn fire off and pour the hot milk into the (Egg yolk mixture) 3 separate times while stirring with a whisk.
Preheat fire to medium low heat.
Notes- After completing step 5 below. The custard should be thick and will thicken even more after cooling. If the mesh strainer has lots of egg particles and the custard has a strong eggy smell, you’ll have to remake the custard. It is normal for the custard to have a slight eggy smell once done but will go away after cooling overnight in the fridge. Keep the custard in the fridge at all times and do not leave it out unless you are decorating the cake.
Step 5- Pour (Custard mixture) back into the same medium sized pot. Stir with a silicone spatula or sturdy wooden spoon for 6 to 8 minutes or until mixture thickens. Once done turn fire off and pour Custard mixture into a mesh strainer with a medium sized bowl underneath it. Remove strainer and add 2 teaspoons vanilla extract and stir with a wooden spoon until combined.
Step 6- Gently place plastic wrap on the top of the custard. This will prevent a skin from forming on top. Cover with lid and place into fridge for 6 to 8 hours or overnight. After 6 to 8 hours, you can remove the plastic wrap off of the custard. There will be some custard of the plastic wrap which you can remove and add it back into the bowl by simply using a spatula. You can make this several days in advance.
Gelatin mixture (Part 1)
Note- The Gelatin will make the whipped cream more stable. You can make these 3 days in advance or on the same day you make the custard and bake the cake. As long as to make it the day before you decorate your cake.
Step 7- Add 1 cup hot simmering water and 1 package gelatin into a small bowl. Stir until gelatin dissolves into the hot water. Cover with lid and place into fridge for 3 to 8 hours or overnight.
Preparation of cake batter
Dry ingredients (Cake flour or All-purpose flour mixture)
Step 8- Sift 2 cups cake flour or all-purpose flour, 1/4 teaspoon baking powder, 1 teaspoon baking soda and 1/4 teaspoon salt into a medium sized bowl. Stir all ingredients together and set aside.
Wet ingredients (Milk and sour cream mixture)
Note- Amounts for the milk and sour cream will vary depending on if you are using cake flour or all-purpose flour. The butter extract, cake batter extract and almond extract are optional to use. Also, you will need an acidic ingredient like sour cream or buttermilk (Room temp) to combine with the baking soda and baking powder, resulting in a soft and fluffy cake. Omitting the acidic ingredients will result in a less soft and fluffy cake.
Step 9- If you are using cake flour, add 1/2 cup sour cream (Room temp), and 2/3 cup whole milk (Room temp). If you are using all-purpose flour, add 1/3 cup sour cream (Room temp) and 1/2 cup whole milk (Room temp). Once you have added the milk and sour cream, add 2 teaspoons vanilla extract, 1 teaspoon butter extract (Optional), 1 teaspoon cake batter extract (Optional) and 1/2 to 1 teaspoon almond extract (Optional). Stir all ingredients together until combined and set aside.
Butter and sugar creaming method
Note- Make sure your butter is soft and at room temp. You can use vegetable or canola oil. You can also use and hand or stand mixer for this recipe.
Step 10- Add 1 1/2 sticks unsalted butter (Softened and at room temp), 2 to 3 tablespoons vegetable or canola oil, and 1 3/4 cups sugar into stand mixer bowl fitted with paddle attachment. Mix on high speed for 6 minutes. Scrape down sides of bowl.
Adding the eggs
Step 11- Add 3 large eggs (Room temp) into the mixing bowl one at a time while mixing on a medium speed until combined. Scrape down sides of bowl.
Alternating cake flour / all-purpose flour mixture and the milk / sour cream mixture into the batter.
Step 12- Add the (cake flour or all-purpose flour mixture) and the (milk and sour cream mixture) into the batter 3 separate times. Mix on a medium low speed for 15 to 20 seconds or until combined the first 2 times. The third time you will mix on a medium speed for 15 to 20 seconds or until combined. Make sure you scrape down the sides of your mixing bowl each time.
Baking the cake
Preheat oven to 325 degrees.
Notes- You can make the whipping cream and melt the Gelatin while the cakes are in the oven. All steps to these methods are below. Be sure that once the whipped cream is prepared to place into the fridge to set do not leave it out.
Step 13- Spray both of the 9-inch round cake pans with Baker’s joy non-stick baking spray. Add prepared cake batter into both baking pans. Spread batter around baking pans as evenly as possible. Shake pans slightly to make batter more even.
Step 14- Place into a preheated 325-degree oven on the middle rack for 35 minutes.
Step 15- Remove cakes from oven. Toothpick inserted should come out clean. Let cool completely. This should take about 3 to 4 hours. Once the cakes have cooled, Trim off the top portion of cake and poke holes into it with a large fork and set aside.
Gelatin mixture (Part 2)
Step 16- Add 1 tablespoon of firm gelatin mixture and place it into a small glass bowl. Place into the microwave on the defrost setting for 1 minute or until Gelatin is completely melted.
Making the Whipped cream
Notes- Make sure you place your mixing bowl and attachments into a fridge. Your heavy whipped cream should be cold. You can also make these 2 days in advance or when the cake is in the oven. After the whipped cream is prepared, place it into the fridge to keep it cold. Do not leave it out. The salt is being added to bring out the flavors.
Step 17- Add 3 1/2 cups heavy whipping cream (Cold), 3/4 cup + 2 additional tablespoons confectioners’ sugar, 1 tablespoon vanilla extract, 1/2 or 1 teaspoon cake batter extract (Optional), and 1/8 teaspoon of salt into stand mixer bowl.
Step 18- Mix on high speed for 6 minutes. At the 4-minute mark, add the 1 tablespoon melted Gelatin (From step 16) and continue to mix on high speed for 2 to 3 minutes or until whipped cream has thickened.
Troubleshoot (Important) – If your whipped cream is runny, do not proceed to decorate your cake. It is imperative that your whipped cream be thick. If it is not thick, it will not hold up the cake when decorated. Place whipped cream into the fridge for freezer for 15 to 30 minutes. Once done, remove from fridge or freezer and mix on high speed or until whipped cream is thick.
Preparation of toppings
Bananas
Note- The bananas will not taste like lemon juice when coated. The flavor or the bananas will overpower it.
Step 19- Slice 5 large bananas and place into a medium sized bowl. Squeeze half of a lemon and rub lemon juice into palms of your hands. From there coat the lemon juice onto the bananas. This will prevent the bananas from turning colors.
Vanilla wafers
Step 20- Reserve 18 or 20 vanilla wafers from the package. This will be used for the decoration for the top of the cake. Add the rest of the vanilla wafers into a food processor. Pulse 12 to 15 times or until wafers are coarse crumbs. Once done, place into a medium sized bowl and set aside.
Decoration of cake
Step 21- Add bottom layer of cake onto a cake serving pad. Take serving pad and add it onto a cake turn table. If you don’t have a cake turntable that’s totally fine. Make sure the side where you poked holes into the cake is facing upwards and the cake is leveled. Add 1 1/2 cups whipped cream into a disposable piping bag with the tip cut off. Pipe a 1 1/2-inch border around the top edge of the cake layer.
Step 22- Add banana slices onto the top center of the cake layer. Do not add any onto the edge of the cake layer. Add crumbled vanilla wafers on top of the banana slices and pour 1 1/2 cups of vanilla custard on top. If you notice that the custard is getting close to overflowing, pipe another border on the top edge of the cake layer. Carefully stir custard into vanilla wafers and add more if you like.
Step 23- Carefully add the second cake layer on top and press down very slightly to seal. Glide offset spatula onto the sides of the cake. Fill in any gaps with whipped cream. Use only a small amount of the whipped cream.
Step 24- Pipe a 1 1/2-inch border around the top edge of the cake layer. Add banana slices onto the top center of the cake layer. Do not add any onto the edge of the cake layer. Add crumbled vanilla wafers on top of the banana slices and pour vanilla custard on top. If you notice that the custard is getting close to overflowing, pipe another border on the top edge of the cake layer. Carefully stir custard into vanilla wafers and add more if you like.
Step 25- Add 1 1/4 cups whipped cream on top of cake and wait 5 or 10 minutes before spreading the whipped cream on top of the cake. This will allow the custard and wafers to set. From there, carefully spread whipped cream onto the top layer of cake. Add extra if you like to fill in the gaps. Smooth out as even as possible with offset spatula.
Step 26- Add Whipped cream onto the sides of the cake and smooth out with offset spatula as even as possible. Once done, carefully add cake turntable onto a large pan. Make sure pan is larger than the diameter of the cake turntable.
Step 27- Blend vanilla wafer crumbs in food processer until they are fine crumbs. From there, add crumbs into the palm of your hand and gently add it onto the sides of the cake. Any loose crumbs will fall into the large baking pan underneath. Any remaining crumbs on the cake turntable or cake pad can be carefully brushed off using a pastry brush.
Step 28- Add coupler into disposable piping bag with the tip cut off. Add Wilton # 1M tip on the coupler which should be sticking out of the tip of the piping bag. A large screw should have come with the coupler. Screw the Wilton # 1M tip on to the coupler using the large screw.
Step 29- Add 1 1/2 cups whipped cream or the remaining whipped cream into the piping bag fitted with the Wilton # 1M tip. Pipe medium sized circle spheres around the top edge of the cake. Make sure no gaps are present when done. Also pipe a small circle sphere in the middle of the cake as well.
Step 30- Add banana slices, followed by the crumbled vanilla wafers and custard onto the top middle of the cake. Don’t add any banana slices on to the edge or middle of the cake where you piped the circled spheres.
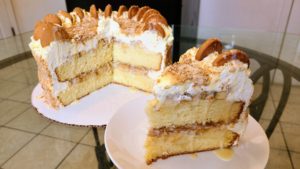
Step 31- Add 18 or 20 of the whole vanilla wafers, a small amount of the vanilla custard and lightly sprinkle the crumbled vanilla wafers onto the top edge of the cake where you piped the circled spheres. Turn the cake turntable slightly while lightly pouring the vanilla custard on top of the vanilla wafers.
Storage and serving (Important)
Step 32- Once the cake is completed, do not cut. Keep cake in fridge at all times unless you are serving it. It will last about a week in the fridge. Place into the freezer for 10 to 15 minutes. Place cake onto a cake serving dish with a cover large enough to cover the cake. You can also use a large pot to cover the cake if it can fit. Place cake into the fridge for 6 to 8 hours. This will allow the cake to set. Once the 6 to 8 hours is over, you can serve the cake. Remove from fridge and wait 30 minutes to an hour before cutting, this will allow the cake to thaw out some. From there it is ready to be served.
YouTube instructional video